My Relish Recipes

Wednesday, November 9, 2022

Chocolate Lava Cake Recipe
November 09, 20220 Comments

Easy Recipe For Chocolate Lava Cake

Posted By Nimra Siddique

chocolate lava cake


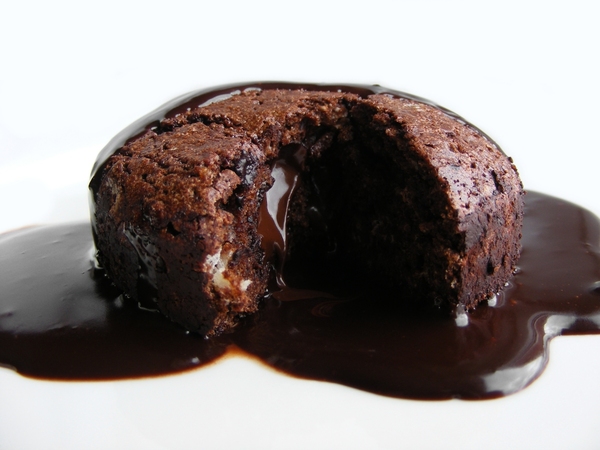
We love to share an easy recipe for chocolate lava cake. This cake is full of molten chocolate. We can make this chocolate lava cake in 30 minutes. Cupcakes with chocolate are desirable for any occasion, like weddings, birthday parties, etc. You can make a yummy chocolate lava cake using the simple ingredients below.


You will not believe it is elementary to make a  chocolate lava cake at home. They are the perfect individual sweet because they're less undercooked, resulting in gooeyness. Now add the melted chocolate over the jelly.


These molten chocolate cakes are perfect for special occasions like wedding ceremonies, Mother's Day, and a regular weekend. Because you only need a few pantry staples, these are ideal for a quick dessert. Try my pastry cake, cupcake, or chocolate lava cake recipes for another chocolatey dessert.

Ingredients that are used in chocolate lava cake

1. Chocolate

In this way, you can use 60% hot cocoa. I like to use half-sweet chocolate, but you can part with dark chocolate. To get the best smooth and melty centers, I recommend using a high-quality baking chocolate bar, such as Ghirardelli.

2. Butter

Use unsalted butter to prevent the chocolate lava cakes from becoming too salty.

3. Eggs 

Two eggs and two egg yolks are required for this lava cake recipe. 

If you want to make richness and creaminess of this chocolate lava cake, you can add more yolks 

4. Flour 

These pastry cakes require very little flour. The flour adds structure, but too much will interfere with the molten centers.

5. Salt 

6. Sugar 


chocolate lava cake

The Process of Making the Chocolate Lava Cake


1. Melt the butter and chopped chocolate two times; heat them, stirring until smooth, Or you may put the butter and chocolate in a microwave pan and melt it for min 25-30 sec, stirring after a while until it will be smooth.

2. Combine the eggs, egg yolks, sugar, and salt in a large mixing bowl. Mix it to make the mixture thick and pale yellow.

3. Mix the chocolate and flour mixture into the egg mixture.

4. For the combined mixture, fold it.

5. Divide the batter among butter and flour; remix and bake it for 5 to 6 minutes. Cupcakes are firm but jiggly. Let the cakes cool for at least 2 minutes.

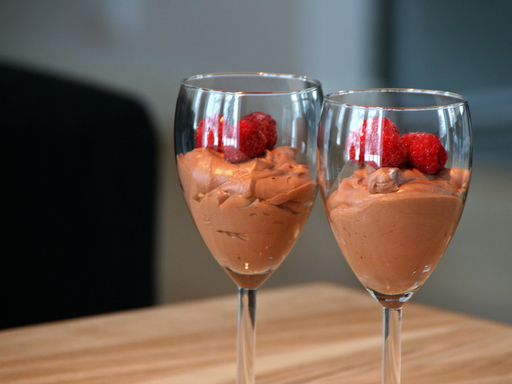
6. Carefully place a small dessert plate on top of each ramekin and invert the chocolate lava cake onto the plate. Stay a while for at least 5-10 sec to unmold the cake. Sprinkle some granulated sugar, and add some berries. Serve the chilled cakes for the best results.

Review Of The Recipe For Chocolate Lava Cake


Refrain from filling the measuring spoon with flour. Fluff the flour before sprinkling it into the tablespoons or weighing it with a scale. The center will become firm if you can make it better by adding more flour.

Before placing the ramekins in the oven, ensure they are completely hot. Because of the high temperature, the outside of the cake bakes faster than the inside. That produces a perfectly cooked exterior while the chocolate lava filling remains gooey!

Use room-temperature eggs to ensure they mix into the batter without being over-mixed. If your eggs are cold, place them in a bowl of warm tap water.

Keep an eye on the chocolate lava cakes as they bake.


lava cake

The Good Representation Before Serve


Serve these warm chocolate pastry cakes with vanilla ice cream, a drizzle of hot fudge sauce, or a heaping spoonful of whipped cream. Fresh berries or sprinkles make an excellent garnish. I also enjoy drizzling caramel on top of the cakes!


Reading Time:

Monday, November 7, 2022

Recipe of Chocolate Mousse
November 07, 20220 Comments


Quick and Easy Recipe of Chocolate Mousse


Posted by Nimra Siddique


Chocolate Mousse

Chocolate Mousse 

It has a light, airy appearance, an intense chocolate flavor, and a soft, melting texture on the palate. Savory or sweet dishes with the consistency of dense foam made from a puréed main ingredient combined with stiffly beaten egg whites, whipped cream, or both Mousses are almost always served cold, and sweet mousses are occasionally served frozen. Sometimes people like to serve hot coffee with chocolate cakes and chocolate mousse.

This classic chocolate mousse is light but rich in chocolate flavor. This dish is quick and simple to prepare specifically concerned as an Easter dessert.


Chocolate mousse with hot coffee

Ingredients for Chocolate Mousse


                       3 tbsp unsweetened butter

                       6 oz. high-quality semisweet chocolate

                       Three large room-temperature eggs, yolks, and whites separated

                       12 tsp cream of tartar

                       14 cup sugar plus two tablespoons

                       12 cups cold heavy cream

                       12 tsp vanilla extract


Quick Recipe


12 cups chilled heavy cream

2 tsp. sugar

Shavings of chocolate


In a medium microwave-safe bowl, place the butter. Place the chocolate in the bowl in small pieces. Microwave it in 20-second increments, stirring after each, until the chocolate is 75% melted. Stir to allow the chocolate to boil. With a wooden spoon, stir until the chocolate is melted and smooth.) Allow a few minutes for the mixture to cool before whisking; mix the egg's yolk one by one. Leave side drops of the eggs in a bowl or electric hand mixer on medium-high speed until foamy. Mix in the cream of tartar until soft peaks form (the peaks should start after once a second mix them correctly. Gradually beat in 1/4 cup sugar and mix them until they look like same. Mix the egg and chocolate until the mixture is uniform with good spine leaves aside.

Beat the heavy cream in a separate bowl. At medium-high speed, until it thickens. Continue to win in the remaining two tablespoons of sugar and the vanilla extract until the mixture is smooth. Make sure it's completely incorporated, but keep the mix manageable. Divide the mousse among six individual glasses, cover, and wait 2 hours until set.

Whip the cream until it thickens, up to a few hours before serving. Whip the sugar into medium peaks. Dollop whipped cream to cover the top of the mousse with chocolate.


Make-Ahead time can be one hour. Refrigerate until chilled, wrapped in plastic wrap.


Please keep in mind that chocolate mousse is made with raw eggs. If this is a concern, look for pasteurized eggs. Eggs that have been pasteurized have Whole Foods usually carries them, but call ahead to make sure before making a memorable trip. (Note: Eating raw eggs is not recommended for sensitive people like babies, pregnant women, etc.


chocolate mousse

Nutrients: 

Calories:415

Fat:31 g

Saturated fat: 19 g

34 g carbohydrates

31 g of sugar

2 g of fiber

Protein: 5 g

Sodium: 55 mg

163 mg of cholesterol


Conclusion


To our knowledge, these recipes are gluten-free or readily available in gluten-free varieties. Many foods contain hidden gluten; if you're one, there is no gluten in these ingredients, and your ingredient labels ensure they're gluten-free.

Chocolate mousse is a common ingredient in chocolate desserts. People of almost all ages love chocolate mousse. It has a light, airy texture and an intense chocolate flavor and is soft and melting on the palate.


Reading Time:

Wednesday, November 2, 2022

HOT AND SOUR CHICKEN RECIPE - CHINESE CUISINE
November 02, 20220 Comments

QUICK RECIPE OF HOT AND SOUR CHICKEN - CHINESE CUISINE

Posted By Aiman Ahmed


Sweet and Sour Chicken


RECIPE OF HOT AND SOUR CHICKEN       

Aren't you bored of eating desi food daily? Do you want to try something different? Just like hot and sour chicken which is full of flavor and is healthy too. Oh, you don't know how to make it? Well- nothing to worry about. Let me introduce you to hot and sour chicken in my style. Let's get started.


INGREDIENTS:


FOR CHICKEN MARINATION:

To marinate chicken, all you need:

Chicken boneless ½ kg.

Egg white 1 large egg.

All-purpose flour 2 tbsp.

Corn flour / Corn starch / Rice flour ½ cup.

Salt ½ tsp or according to taste.

Garlic powder 1 tsp.

White pepper powder 1, ½ tsp.

Water 2 tbsp or as needed to make a paste.

Oil for frying.

FOR THE HOT AND SOUR SAUCE:

For making the kick of our dish, which is the sauce, you will need is:

Tomato ketchup 4 tbsp.

Brown sugar powder 3 tbsp.

Soy sauce 1 tbsp.

Salt according to your taste.

Vinegar 2 tbsp.

Hot sauce 2 tbsp.

Chili sauce 1 tbsp

Corn flour/ rice flour 1 tbsp.

Water 2 tbsp.

Oil 1 tbsp.

SOME VEGGIES:

To make our dish healthier and give it a Chinese cuisine touch, we will add some veggies that are:

Onion ½ cup.

Capsicum ½ cup.

Red bell pepper ½ cup.

Yellow bell pepper ½ cup.

Green onions ½ cup.

Pine apple ¼ cup.

Oil 1 tbsp.


Hot and Sour Chicken


METHOD:

The complete cooking process will be divided into 3 easy steps

FIRST STEP:

Our first step is of preparing chicken.

Firstly, cut the chicken into cubes.

Take a bowl, add corn flour, all-purpose flour, salt, garlic powder, and white pepper powder and mix it up properly.

Then add egg white and water and make a smooth paste.

Now add chicken cubes to the mixture and mix them very well, in such a way that all the ingredients are well combined.

Let the chicken enjoy for half an hour with all its spices.

Add cooking oil to the pan on the stove at medium flame.

Add chicken pieces in medium hot oil and fry them till it gets a nice golden brown color.

Now, set aside.

2ND STEP:

In the second, we will sauté veggies.

Cut all the veggies into cubes.

In a wok add oil, heat it, and add all veggies.

Let's fry it for min 3-4 minutes.

3RD STEP:

In the third and last step, we will make a sauce for hot and sour chicken.

In a wok, add oil and heat it a little bit.

Then add tomato ketchup, hot sauce, chili sauce, brown sugar, soy sauce, salt, and vinegar. Stir it properly until the sugar melts.

Now add water in corn flour and make a smooth paste and then add it to the wok.

ASSEMBLE:

Now the final step is to mix the fried chicken, the sautéed veggies, and the delicious hot and spicy sauce. Serve it with freshly made fried rice or fried noodles.

Enjoy the mouth-watering Chinese cuisine, Hot and Sour Chicken.


Reading Time:

Wednesday, October 26, 2022

No Oven Chocolate Cake
October 26, 20220 Comments

               “No Oven Chocolate Cake Recipe”


Posted by Faryal Shah


No Oven Chocolate Cake


INGREDIENTS FOR THE CAKE:

Flour ½ cup

 Dark cocoa powder 8 tbsp
Baking soda ¼ th tsp
Baking powder 1 tsp
Pinch of salt\
2 eggs
Milk ½ cup
Butter ½ cup
Granulated sugar 1 cup
Vanilla essence 2 drops


 INGREDIENTS FOR SOAKING:

Chocolate milk or plain milk ⅓ rd cup

                               OR
1 tbsp coffee 
⅓ rd cup water
Sugar 2 tbsp or condensed milk


INGRIDIENTS FOR GANACHE:

Fresh Cream 200ml

Dark cooking chocolate sweetened 1 cup (chopped)
                              OR
Any chocolate spread/Nutella


METHOD:


The Chocolate cake seems like a delicious heavenly dessert which is easy as pie to forge a cake if you know the baking tips, either stove or oven baking but we’re not going to use any of these methods because I have something special for you to easily make one of the best cakes of all time in your life with the most straightforward way “No oven Chocolate cake” where I'm going to use a nonstick pan, the flavor of this cake will blow your mind I'm challenging you! subsequently, you can create cakes for any event in just 20 minutes.


No Oven Chocolate Cake Recipe


                                                            STEP 01

 No use of baking molds or tools, the perfect and startling taste, so let's start by greasing the Non-stick heavy bottom pan by melting the half cup of butter in it on low-medium heat, we do not want the butter to get burned, transfer the butter to your bowl which already has greased your pan.


                                                           STEP 02

 Next, we’ll be sifting all the dry ingredients flour, baking soda, baking powder, salt, and cocoa powder, this will help you to facilitate the whole process. Set aside the dry components.


                                                           STEP 03

 Head to the next step, then add sugar to the melted butter, you can use granulated or powdered sugar for a quick mix. This is a very important step where the sugar needs to be completely dissolved, take 2 eggs at room temperature and add 1 at a time into the bowl of sugar and butter mixture, whisking gently until a gooey foamy texture appears.


                                                         STEP 04

                  Add the dry mix to the bowl and coat the batter using a spatula do not use a whisk for this step start coating the batter in a clockwise direction & do not over-mix the batter just when you see the dry ingredients disappear, incorporated well then add the milk in it. 


                                                        STEP 05

Now to the last step add 2-3 drops of vanilla essence & mix well. Our batter is ready to go in the pan place your greased pan on the stove on a medium-low flame and pour the batter in it gently, cover the lid and leave it for 20 minutes, give a toothpick test to the cake after 20 minutes, do not disturb the cake in between and if the toothpick comes out with the batter then give more 3-4 minutes.

          When it's ready don't bring it off the pan it will immediately break into pieces the hot cake is so soft enough so let it cool completely on the counter.


                                                     STEP 06

On the other side, let's prepare the soaking syrup, now you can use milk for this cake but I'm using coffee syrup that gives amazing flavor to the decadent chocolate cake, take 1 tsp coffee in half a cup of water and 2 tbsp sugar mix it and your syrup is good to go, prick the cake with fork or knife and pour syrup over the cake.

Place the soaked cake in the fridge for about 30 minutes at least.


                                                    STEP 07

It's so easy to make ganache with dairy cream and cooking chocolate and personally, if you want to make this cake more rich and flavorful you can use imported chocolates e.g KitKat, mars, etc.

     Using a small non-stick pan, heat the dairy cream and bring it to a boil then add chopped chunks of chocolate, it is essential to cut those pieces to melt them easily. I’ve used a nonstick pan so that my chocolate and cream don't get burned.

when you add chocolate turn off the store and stir, the residual heat will melt the chocolate perfectly .refrigerate for about 30-40 minutes.

          I prefer to use dark semi-sweet cooking chocolate if you don't wanna use imported ones. 

         All the things are ready to assemble so let's get to it.


No Oven Chocolate Cake


                                                    STEP 08

Place the cake back into the pan it looks cute but that's optional, then add your ganache to the top and spread it gently with a spatula or knife.

         Decorate it with any kind of chocolate shavings, chocolate syrup, chocolate pieces, wafers & sprinkles.

Refrigerate for 1 hour, Our cake is prepared.

 cut a slice, and enjoy ;)


Chocolate cake recipe


 Tips:

I didn't use any baking tools or molds but still, I'm kinda shocked that my cake was baked on the stove in a nonstick pan perfectly.

Now keep in mind if you are using any kind of nonstick pan for the cake make sure the bottom must be heavy but if it's a thinned bottom pan then place a griddle under it.
 The flame should be medium to low. Most importantly do not skip the butter otherwise you will not achieve the perfect taste and texture of the cake. It is the star ingredient of this recipe and the cocoa powder should be rich and dark, dutch processed cocoa powder does not confer better results.
You will feel the difference after using it at once.
Do not over-mix the batter because if you do the cake will lose the air majorly this step leads to how much you want to make the cake aerated, light, and moist but however overmixing results in a non-aerated, dense, chewy cake.


Reading Time:

Monday, October 24, 2022

Macaroni Fruit Salad
October 24, 20220 Comments

MACARONI FRUIT SALAD Macaroni Fruit Salad Recipe

Posted By Faryal Shah


Macroni Fruit Salad


Ingredients:


Chilled Cream 200 ml

Cocktail fruits 1-cup

Apple cubes cut 1-cup

Banana 1-cup

Boiled macaroni 1-cup

Condensed milk 2-3 tbsp

Vanilla essence 2-drops

Mayonnaise ½ -cup

Black pepper 1-tsp

Pineapple with juice ½ cup

Salt as per taste


Macaroni Fruit Salad


METHOD:


Let's prepare the macaroni fruit salad which is one of my favorite of all salads, rich creamy, sweet and flavorful best for all occasions and festivals as a starter. So let's dig into the recipe first of all you need to boil the macaroni following the packet instructions & while boiling make sure to add 1-2 tbsp oil in it so it won’t stick together and salt as per taste.

Secondly, take a bowl, add dairy cream, mayonnaise & condensed milk together whisk it gently then we’re going to add pineapple tin juice which is superb for the salad to give a smooth creamy texture and pineapple mouthwatering flavor to the salad it will also help to remain juicy fruits in the creamy salad what a sweet combo!

       When our sauce is whisked well then we’ll add a few spices like black pepper and salt that's it, kinda easy but so delicious.


Creamy Fruit Salad


For this salad, it's all up to you what kind of fruits you want to add to this appetizing salad just as pomegranate, cheese cubes, grapes, etc. According to my recipe, I’ve added in apples, bananas, pineapple chunks & heavenly delicious cocktail fruits.

Cut them into whatever shape you like, small or large any size. I guarantee for the taste when you’ll take the first bite and that melting sweetness will fly you to the sky, my mouth is watering too right now but let's just mix fruits in a creamy sauce, coat each fruit piece in it, and at last we’ll add vanilla essence. Here I'm giving you choice for essence as well, any chocolate, vanilla, or strawberry essence will work perfectly for your salad.

Top it off with some cherries if you like or garnish it with dry fruits raisins, nuts, almonds, peanuts, chocolate chips, and additionally any chocolate sauce.

My life has become easier for starter recipes as this one is on my list now and for the rest of my life. it is just something that's called a salad but of course, it's a sweet, summer-craving bowl of happiness that you can serve with any type of meal it perfectly goes with pasta, steak, and sandwiches. it's a go-to recipe for Macaroni Fruit Salad that barely takes time and tada we’re ready.


Tips:

    The most comforting tip is to serve it chilled, so it’ll taste better, the cream thickens giving your salad a luscious smack.


Reading Time:

Sunday, September 5, 2021

Chicken Shawarma
September 05, 20210 Comments


Chicken Shawarma with Mayo Garlic Sauce Quick Recipe Chicken Shawarma with Mayo Garlic Sauce Quick Recipe

Posted By Faryal Shah


Shawarma


Chicken Shawarma is originated from Arabic Cuisine but very famous in Asian as well as European Countries. Its spicy & juicy chicken filling with veggies and special sauce wrapped in pita bread is the most delicious street food in Pakistan, India, U.A.E, and other Asian & European countries.

It's very easy to cook, within less time and a few ingredients. First, we will make the fillings, then the sauce, and at last prepare shawarma.

I love this quick recipe & I hope you will also like it.


Ingredients for filling:


Pita Bread / Tortilla Bread 

(Both loaves of bread have different tastes)

Chicken Boneless 500 gm

1 Tsp black pepper

1 Tsp white pepper

1 Tsp paprika powder

1 Tsp ginger powder

1 Tsp cumin powder (zeera powder)

1 Tsp salt 

1 cup plain yogurt

1 Tbsp garlic & ginger paste

1 Tbsp lemon juice

1 Tbsp vinegar

2 Tbsp cooking oil

1 Tbsp tomato paste

A handful of fresh chopped parsley/coriander


spices
Spices


For Dressing:

Fresh chopped 1 tomato

Fresh chopped 1 cucumber

Fresh chopped 1 onion


yogurt spices
Yogurt spices

Put the yogurt, oil & these spices in a bowl and mix well. Now add the chicken into this mixture again mix them and put them into the refrigerator for marination for at least half an hour.


Ingredients for Mayo Garlic Sauce:


1/2 cup mayonnaise

1/4 cup plain yogurt (softly beaten)

1 Tbsp vinegar (very important)

1 Tsp olive oil/cooking oil

3-4 fresh crushed garlic cloves

half Tsp garlic powder (optional)

1 Tsp salt

1 Tsp fresh chopped parsley/coriander


Put all the ingredients in a bowl & mix well. preserve it in a jar covered with a lid and keep it in the refrigerator. It can be used for 3-4 days. All the spices and ingredients make a unique rich taste & aroma in this recipe.


Marinated chicken
Marinated chicken


Now put a pan on heat & add the marinated mixture into the pan. There is no need to add any oil to the pan because we have already added oil to the mixture. Cook the chicken on medium flame until the water dries and the chicken becomes tender. The sheen of oil appears around the pan then turn off the flame.


Now take the pita bread/tortilla bread & spread with mayo garlic sauce then add chicken, tomato slices, onions & cucumber slices. Then spread some tomato garlic sauce and more mayo garlic sauce & wrap it slightly.


Chicken Shawarma
Chicken Shawarma


Now let's prepare the shawarma. Take a pan and grease with oil slightly. Put the shawarma into the pan on low flame and grill it from both sides. Now remove it from the pan and serve it with french fries & chili garlic sauce/tomato ketchup.


Reading Time: